Ivorey™ has a wide range of built-in features, and we always recommend using these where possible, to keep everything in one platform and avoid the tech headaches that come with stitching tools together.
That said, if you need to connect Ivorey™ to an external platform or tool that isn't available as a native integration, there are several ways to do it. This guide covers your options so you can choose the approach that best suits your needs and technical comfort level.
This guide is perfect if you want to:
Connect Ivorey™ to an external tool or platform that isn't natively integrated
Understand which integration method is best suited to your use case

An API key gives an external platform or tool direct access to your Ivorey™ account, so it can send, retrieve or edit data like contacts, opportunities, or calendar bookings, without you having to do it manually. The connection is managed from the external platform using your Ivorey™ Private Integration Token (API Key).
This is a two-way connection that comes at no additional cost, and is best for platforms that support direct API connections. Please refer to our API Keys guide for the detailed steps.
A webhook is a way for Ivorey™ to automatically push data out to another platform the moment something happens, without the external tool needing to ask for it. For example, when a contact submits a form, makes a purchase, or reaches a certain pipeline stage, Ivorey™ can instantly send that data to another platform via webhook.
The webhook is set up and managed from inside your Ivorey™ workflows. This is great option if the external platform or tool provides a webhook URL, and you are only needing to push your Ivorey™ data out to the external platform (not the other way around).
Copy the webhook URL from your external platform or tool (please refer to the relevant platform’s support resources to find this)
From the main Ivorey™ menu, go to Workflows > open an existing workflow or click [+ Create New Workflow] > and select [+ Start from Scratch]
Note: If you're trying to send data after someone fills in a form or makes a purchase, you should already have workflows set up for that. In this case, you would just be adding an extra step to your existing workflows. If you’re creating a new workflow, ensure to set the relevant trigger.
Click the [+] plus icon to add an action > search for and select the [Webhook] action > set the Method to [POST] > and paste in the webhook URL you copied from the external platform (this is the destination where Ivorey™ will send the data)
(Optional) Under Custom Data, click [+ Add item] to include additional fields in the data that is sent:
Key - the label for the data field you are sending (e.g. “lead_source” or “product_name”) - use simple text with no spaces
Value - the data to send, click the 🏷 tag icon to use Custom Values - e.g. {{contact.email}} or {{contact.first_name}}
Click [Save Action] > toggle you workflow to [Publish], in the top right corner > and click the [Save] button
Test your workflow by completing the trigger (e.g. submit the form, or place the test purchase) > and confirm if the data arrived in the external platform
Note: The external platform's documentation should tell you what URL to use, what data fields they expect, and whether any additional setup is needed on their end. Ivorey™ support can help you set up the webhook action inside your workflow, but can’t provide support for configuring the receiving platform.
Tools like Zapier and Pabbly can also act as a bridge between Ivorey™ and thousands of other platforms, with no developer skills required. These tools work in both directions - sending data into Ivorey™ from another platform, or sending data out.
They are managed from inside the Zapier or Pabbly dashboard. You can also use our Google Sheets workflow action alongside Zapier, to allow for more flexibility.
Zapier is a popular no-code integration tool. It works well for sending data into Ivorey™ - for example, creating contacts, applying tags, or triggering workflows inside Ivorey™ from an external platform.
One important limitation: if you need to send data out of Ivorey™ via Zapier, the options are very limited. Currently the only outbound trigger available is Pipeline Stage Changed. If you need more flexibility, use Pabbly instead - or use the Google Sheets workaround below.
Note:
Zapier is a paid tool - check current pricing at zapier.com
Ivorey™ doesn't appear in Zapier under its own name - search for LeadConnector
If you want to use Zapier but need to send data out of Ivorey™ beyond what the available trigger supports, you can use the Google Sheets workflow action in Ivorey™ as a bridge. This sends your Ivorey™ data to a Google Sheet, and then Zapier watches that sheet for new rows and triggers from there - opening up connections to virtually any platform.
Note: The Google Sheets workflow action is a premium action and incurs a small additional charge per execution. Refer to our Billing & Inclusions guide for current pricing.
Create a Google Sheet > and make sure to add column headers in Row 1. Common headers include:
First Name
Last Name
Tag (or any other custom fields you need to send)
From the main Ivorey™ menu, go to Workflows > open an existing workflow or click [+ Create New Workflow] > and select [+ Start from Scratch]
Note: If you're trying to send data after someone fills in a form or makes a purchase, you should already have workflows set up for that. In this case, you would just be adding an extra step to your existing workflows. If you’re creating a new workflow, ensure to set the relevant trigger.
Click the [+] plus icon to add an action > search for and select the [Google Sheet] action > set the Action to [Create Spreadsheet Row] from the drop-down
Note: If it’s your first time, it will prompt you to connect your Google account (you can also do this by navigating to Settings, from the main Ivorey™ dashboard > Integrations > search Google > and click [Connect])
Select the relevant Drive from the drop-down > select your Spreadsheet > and select the Worksheet (tab) inside it
Select the Starting and Ending columns (e.g. from A to D, or however far your headers span)
You’ll now see a list of each column and can map your fields > click the 🏷 tag icon to add Custom Values to insert the correct data - for example:
In the first name field - Click 🏷 tag icon > Contact > First Name to get the first name custom value (i.e. {{contact.first_name}}) so Ivorey™ can input the person’s first name
In the last name field - Click 🏷 tag icon > Contact > Last Name to get the last name custom value (i.e. {{contact.last_name}})so Ivorey™ can pull in the person's last name
In the email field > Click 🏷 tag icon > Contact > Email to get the email custom value (i.e. {{contact.email}}) so Ivorey™ can pull in the person's email address
If you created another header for a tag or custom field, use the relevant Custom Value > or you can type in static text based on what the workflow is, for example:
If this workflow is to tag someone in another platform after they opt-in to a freebie on Ivorey™, you could add text like "opt in: freebie name" in the tag field to send that data to your other platform
Once fields are mapped, click [Save Action]
Toggle your workflow to [Publish], in the top right corner > and click the [Save] button
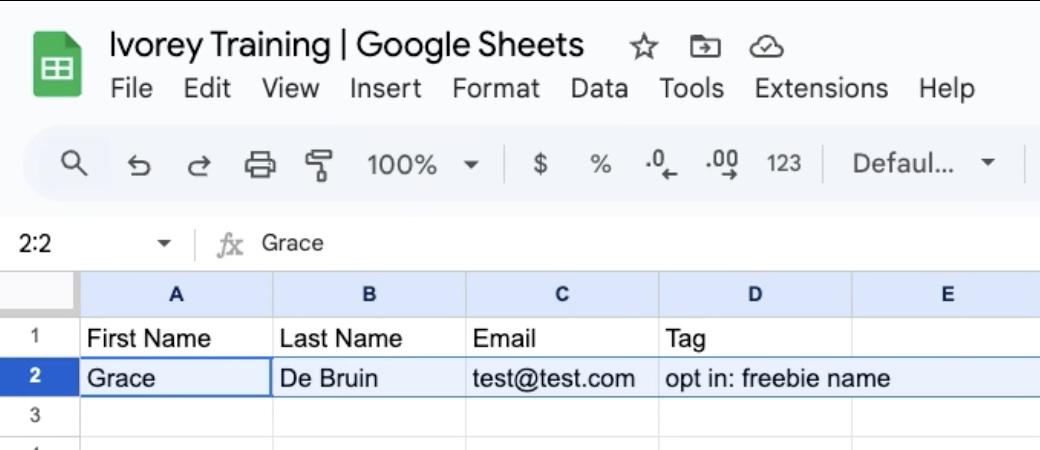
Test your workflow by completing the trigger (e.g. submit the form, or place the test purchase) > check if the data was added to your Google Sheet. Below is an example of a successful test:
In Zapier, create a new Zap with the trigger: Google Sheets > [New Spreadsheet Row] > and connect it to whichever platform you need (Zapier will then wait until a row is added onto your Google Sheet, and trigger the zap)
Pabbly offers far more flexibility than Zapier for Ivorey™ integrations - more triggers, more actions, and is also generally more affordable. If you want to send data out of Ivorey™ without the Google Sheets workaround, Pabbly is the better choice.
Note:
Search for LeadConnector V2 inside Pabbly - view available integrations here
Pabbly is a paid tool - check current pricing at pabbly.com
If your workflow is creating a row but some fields (e.g. product name or order total) are empty, it’s usually because the fields were mapped incorrectly. This can happen if values were typed manually instead of selected from the system field list, or if the wrong field was chosen when mapping.
To fix this, go back to your workflow, update the Google Sheets mapping, and select the correct fields from the drop-down. Once updated, you can complete the workflow trigger again and the data should populate correctly.
For webhook payload size, we recommend keeping payloads lightweight where possible. For long-form report content, it is usually best to send a summary, record ID or external link through the webhook, then store or retrieve the full report from the relevant external system.
Hit the support chat widget inside Ivorey™ - we can:
Walk you through any of the steps
Troubleshoot anything that’s not working
Help you determine which integration method is best for your needs
We’re here and ready to help via the chat widget in the bottom right of your Ivorey™ account. Or if you are looking for done-for-you support, you can browse our current services here 🤍