If you're new to blogging or want to start your own blog but don't know where to begin, this article will help you get started.
Getting Started With Ivorey™ Blogs
Before you steam ahead setting up your blogs, here's some good-to-know information that will ensure you understand how blogs work in Ivorey™, and whether a blog is the right fit for your needs.
What are the benefits of blogs?
A blog (or can be used to embed your podcasts instead) provides a branded online space to connect with your audience, establish your authority, and drive traffic to your content.
It also gives you a high level of security, as your blog is built upon your domain and Ivorey™ account. This means that if your social media accounts were to be disconnected or removed for any reason, you would always have your blog to use as a tool to market to your community.
Helps to drive more Traffic to your business
Each blog you post creates an opportunity for your site to be indexed and ranked in search engines. Regular updates to your blog with relevant content tell Google and Bing that your site is active and you are open for business. All of this leads to better rankings in organic search and more prospects being driven to your site.
Helps you to be seen as a key person of influence in your Industry
By consistently publishing high-quality content, you share your expertise, insights, and unique perspectives on topics that matter to your audience. This attracts readers and earns the respect of peers in your industry, helping you become a trusted resource for industry news, trends, and best practices.
Helps to build Trust with your community
Consistent blogging helps you connect with your audience on a more personal level by showing you understand their pain points and challenges. By providing value, honesty, and transparency in your content, you show authenticity and strengthen your bond with your readers.
Helps to establish strong foundations for your brand
A strong, well-defined brand is more likely to attract and retain customers, so let your posts reflect your brand’s voice, values, and personality. Combined with relevant content, you reinforce your brand, communicate your mission, and differentiate yourself from the competition.
Provides great content for your social media
Every blog you post is a goldmine for social media content. Repurpose the content into infographics, quotes, and snippets so you can keep your social media channels active and engaging. Not only does this attract more social media followers, but it drives traffic back to your blog (and your website).
Helps to convert traffic into paying customers
By posting high-quality blog content, you can connect with your audience by showing you care about their challenges and offering solutions. When they trust you, it’s easier to convert them from visitors to leads with clear calls-to-action that encourage them to provide their contact details in exchange for exclusive content or helpful tools.
Can the Ivorey™ team setup my Blog for me?
Yes absolutely! Our mission is to close what we've coined the 'Implementation Gap', which is why women hire us to "do it for them" every single day! You can browse and book our 'Blog' done-for-you service right here.
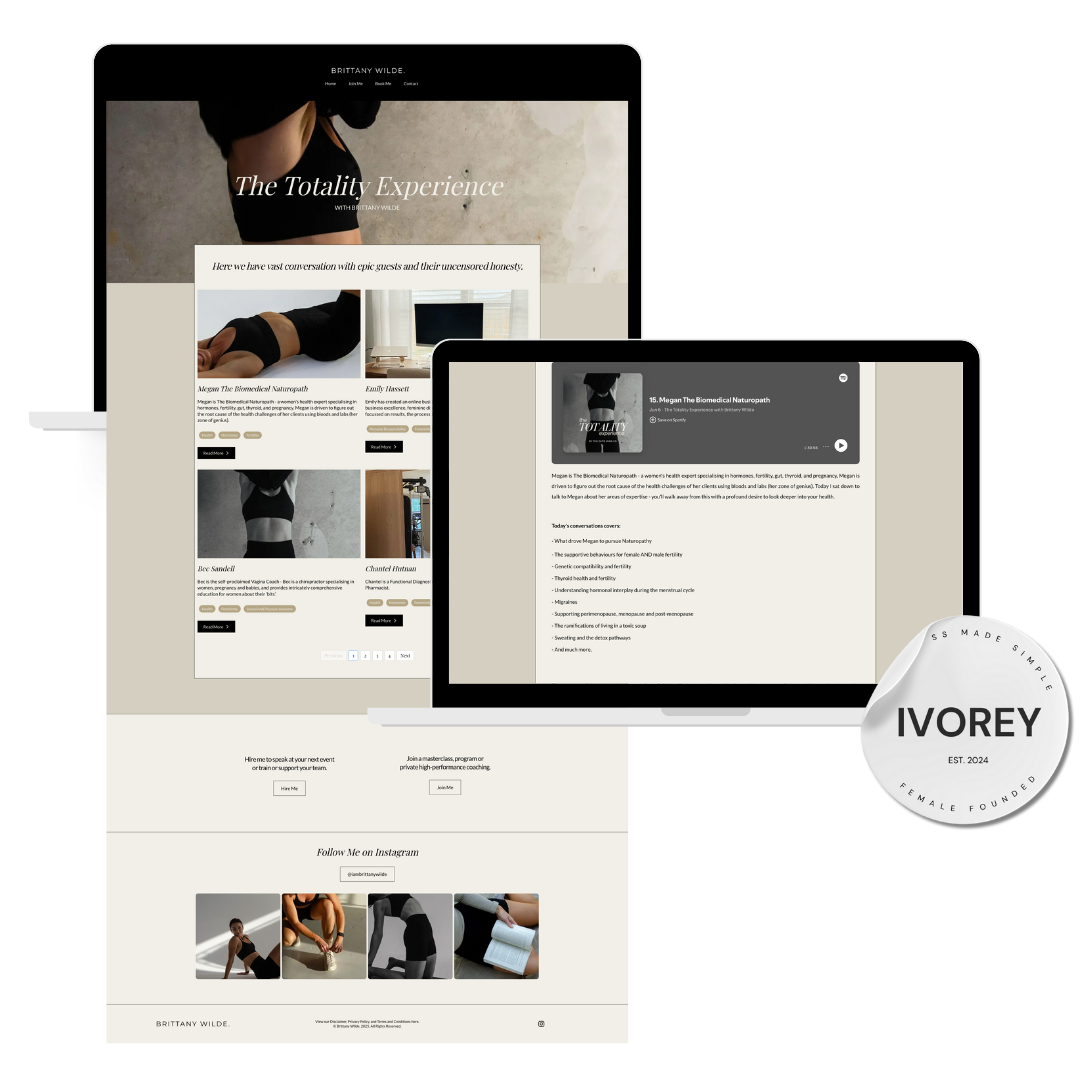
Here is a sneak peak of a past Blog we setup for an Ivorey Member 😍
How To Setup A New Blog: A Step-By-Step Guide
Below is a step-by-step guide of how to setup your new blog - just select the drop-down and follow along!
STEP 1: Download & Customise our Blog Template
🕰️ TIME SAVER: We have created a blog template to help get you started and save you time. Watch the video below or follow the steps to learn how to download our blog template and start making it your own
STEP 1: Download and customise your blog site
To download our blog template, from the Ivorey™ main menu, go to [Site Pages] > then along the top menu bar click [Blogs]
Click on the downwards facing arrow on the right side of the [Create Blog Site] button > and select [Create Blog from Template]
Click on the 'Ivorey Blog Template' > then click [Continue] to download it into your account
Once the blog template has downloaded into your account, click the [Edit Blog Site] button at the top right of your screen to customise the appearance and branding of your Blog Site
Design Note: The blog post element is a dynamic element, which means even when you have created your blog posts, you will see the system placeholders while in editor mode. This is just to show you the overall layout of your blog posts, and these will automatically populate with any published blog posts you've created when in preview or live mode. To see the blog site with your published blog posts, click the preview button, or if you are ready to publish, you can click the publish button.
Once you have finished customising your blog home and post pages, navigate back to the main blog area of your account where the sample post were listed > and click the 3 dots located to the right side of the [New Post] button > click [Settings] > then enter the relevant details in each field
Blog site title: this is what appears in a browser tab title and in search results
Domain & Slug: choose your domain from the drop down menu (e.g yourdomain.com) or leave this blank until you are ready to publish your blog as you can add your domain later > then add your slug (e.g /blog)
Blog Meta Description: this is a is a short summary or snippet of your blog site
Once you have updated the blog settings, click the [Update] button to save your changes
You're now ready to start creating your first post!
STEP 2: Create Your First Blog Post
Now that you have setup your blog site, it's time to create and publish your first blog post! Follow the steps below to see how to do this.
STEP 1: Create your first Blog Post
To create your first blog post, from the Ivorey™ main menu, go to [Site Pages] > then along the top menu bar click [Blogs]
Click into your blog site > then click the 3 dots of one of the example publish posts > and select [Duplicate Post] > once this has been duplicated, delete the two example published post templates so you can choose when your posts are published.
Click into the draft post template > and started writing your first blog post > make sure you click the [Save] button regularly
Once you have finished creating your blog post, click [Continue] at the top right of your screen to publish or schedule your post > and fill in the post fields
NOTE: You will need to add your blog post to a category here, so if you haven't created any categories yet, you can do so by clicking the [+ Add New Category] button and filling in the details
You can also fill in the SEO Meta Data on the right hand side as well as preview your post
Title: this is the title of your blog post
Cover Image: this is the image that will appear as your social media image when shared
Alt Text (Cover Image): this is a short 'tag' to give your image
Post Description: this is a short description for your viewers to get a glimpse of the post. We recommend keeping to 100 - 250 characters
Once you have filled in the above details, click [Publish] or [Schedule] depending on the settings you chose
This will then display under the relevant status of your blog post under the [Blog Posts] tab of your Blog Site and will automatically populate when your blog is live
🕰️ TIME SAVER: Once you have created one blog post, you can continue duplicating it so you don't need to build it from scratch each time. Just click the 3 dots of one of the post > and select [Duplicate Post] > then click into the duplicated post to edit
STEP 3: Connect Your Domain & Publish Your Blog Site
You can skip this step if you already connected your domain to Ivorey™
IMPORTANT: If your domain is currently used for a website outside of Ivorey™, please do NOT complete this step until you are ready for that site to come down. For example, if you have built your website on another platform, but want to transfer it to Ivorey™ then you would rebuild all the site onto Ivorey™ first, and only transfer the domain as the very final step when you're ready to get rid of your old site and use your new Ivorey™ site instead.
STEP 1: Connect a domain or subdomain to Ivorey™
From the Ivorey™ main menu, go to [Settings] > [Domains] > then click [+ Connect a Domain] (if you haven't purchased a domain yet, you will need to purchase a domain with a provider like GoDaddy for example first. Alternatively you can purchase a domain within Ivorey directly by selecting [Purchase a Domain] here)
On the Funnel/Website/Store/Blog/Webinar tab, click [Connect →] > then enter your domain or subdomain in the 'Domain' field
🛑 IMPORTANT NOTE!
If you have a website on another platform you want to keep live that is currently using your main domain, (e.g yourdomain.com) DO NOT connect your main here inside of Ivorey as this will close down your external site (main domains can only be connected to ONE site at a time) Instead you will need to connect a subdomain (e.g offers.yourdomain.com)
If you don't have an external website that you want to keep live, then you can connect your main domain to Ivorey™
Once you have written your main domain or subdomain click the [Continue] button
If you are connecting your main domain (yourdomain.com) make sure you the 'I also want to add www.yourdomain.com' is toggled onIf you are connecting a subdomain (offers.yourdomain.com), you won't have the option to add the 'www.' as this is for main domains only
Depending on who your domain provider is, you may be able to click [Continue] to have these DNS records updated inside your domain automatically, however in most cases you will need to click 'Add Record Manually' to manually update your DNS records
If you are connecting your main domain (yourdomain.com) you will need to add both records to your domain DNS settings
If you are connecting a subdomain (offers.yourdomain.com), you will only need to add the one record to your DNS settings
To add the records from Ivorey™ to your Domain DNS settings, you will need to log into the platform your domain is hosted with (e.g GoDaddy) and add these DNS records inside the DNS settings. Alternatively you can share these records with your Domain Provider directly through their chat support as they will be able to update your DNS records for you
Once your DNS records have been added to your DNS domain settings, you will need to come back to the domain page in Ivorey™ and click [Verify Records]
STEP 4: Publish Your Blog Site
Please make sure you have previewed your site and your pages to make sure you are happy with the formatting, layout and overall reader experience before publishing to ensure a seamless transition.
STEP 1: Publish your blog
From the Ivorey™ main menu, go to [Site Pages] > then along the top menu bar click [Blogs]
Click into your blog site > then click the [Edit Blog Site] button
Make sure everything is formatting and set the way you want it to be and click the preview icon to check the reader experience
When you are happy with your blog site click [Publish] at the top right of your screen
If you haven't connected your domain to your blog yet, it will prompt you to do this in the popup where you can select your domain from the drop down menu > then click [Save]
Congratulations! Your blog is now LIVE and ready to be shared with your community!! 🥂 Don't forget to tag us in your creations so we can celebrate you and share your new blog with our community too!
Frequently Asked Questions about Blogs
Can I use the same domain for my blog as my website?
Yes you can certainly use the same domain you have connected to your website for your blog!
Need Help?
Hit the support chat widget inside Ivorey - we can:
Drop the templates directly into your account if you can't find them
Walk you through any of the steps
Troubleshoot anything that’s not working
We’re here and ready to help via the chat widget in the bottom right of your Ivorey™ account. Or if you are looking for done-for-you support, you can browse our current services here 🤍